Notepad ++ is my favorite text editor. The text editor has been with me since 2008, when he began writing a program with PHP. Before that, I use adobe dreamweaver, because it is easy to use, there is a preview feature and design, so I can know directly the result of the HTML code that I wrote. However, adobe dreamweaver proved too heavy if used continuously and open many files. Finally, I look for alternatives, and met with notepad ++. So far, I am satisfied with the notepad++ features and capabilities
And more importantly, ++ notepad plugin features. Just like wordpress, with additional plugins, the ability of a program can be improved. On the internet, there are many ++ notepad plug-in, I want to point out, any plugins that are useful for developers and designers, especially me.

10 Notepad++ Plugin for Developer and Designer

  1. TextFX Plugin. This plugin will accelerate when writing programs, particularly HTML and XML, with auto close tag, then you do not need to write the close tag. Very easy for web deeveloper.
  2. Colorpicker – This plug-in function to retrieve the color codes with ease, no need extra other program. I recommend plug-in for you.
  3. ClipboardHelper. With this plugin you can put some spots on the clipboard and retrieve it easily. We know, activity often write code using copy-paste, with this plugin, you will be greatly helped.
  4. Web Font N++
  5. NppColdFusion. If you work with cold fusion script, then this plugin will help you speed up work
  6. NotepadSharp - If you are working with C #, then this plugin is for you.
  7. FunctionList This plugin will display all the functions of your project,
  8. PyNPP - If you do a lot of work with a python script, then this plugin will help you.
  9. NppSalt - This plugin will help you when working with teams. A file that has been edited by others will be detected by notepad ++
  10. SnippetExecutor – plugin for compiling and executing snippets of code, and providing the output.
Thats all 10 best notepad++ plugin for developer and designer to speed up their work.

Top 5 Best Screen Recorder Apps for Android

Monday, January 19, 2015
Posted by Brandon

One of the new features introduced in  is an API that Android Lollipop allows apps to capture the device’s screen. Android Kitkat too allowed screen recording but with Lollipop, the process has become almost as easy as recording screencasts on your desktop you launch an app, hit the record button and everything that’s on your screen will be captured as a MPEG-4 video.
We even have lots of apps which can provide you screen recording. You can just type screen recording and find N number of app that provide you this option. You can find lots of free apps and even paid apps which even helps in recording external audio but android lollipop is providing you recording of internal system audio.
android lollipop screen recoder

Here we provide a list of such kind of apps which can easily record your screen.

1. SCR Screen Recorder Free

SCR is another screen recorder app that allows you to do free screen recording for up to 3 minutes, with a watermark added to your video. The app doesn’t have a main interface. Instead it comprises of an overlay of a small rectangular box that will includes 3 buttons: one for recording, another for accessing settings, and a button to exit the app. Once you start recording, you will notice an overlay at the right side of your screen indicating that the app is currently recording.
scr-screen-recorder


2. Shou

Although Shou is still in its beta phase, this app promises a lot of features that most recording apps currently don’t offer. You can use Shou to do screen recording with stereo sound, mirror your device screen to any Miracast or AirPlay enabled devices, and even take a screen shot simply by shaking your Android device. You need to join their Google+ community before you can download the app from the Play Store.
shou

3. iLos

iLos and the screen recorders from Rivulus, Hecorat and Misty let you record the Android screen in multiple resolution including 1280×720 and 1920×1080 pixels at 30 frames per second. The recorded screencast can display touches, there are no ads and you can record videos of unlimited length. These apps do however add their icons in the notification window while the recording is in progress.
Ilos screen recoder


4. Rec

Rec. is a beautiful new screen recording app which provides enhanced and un-tethered access to the screenrecord utility introduced in Android 4.4 Kit Kat neatly packaged into a customisable, intuitive user interface.
rec

5. Screencast Video Recorder App

Screencast Video Recorder is more famous for high quality video recording. Screencast usually captures phone screen available at high quality frames which can be used for high quality MPEG video along with sound effects. In this program, the user gets a gallery to view, delete, or play the videos which were recorded previously.
Screencast-Video-Recorder
Placing adsense ads in middle of all the posts will give a high CTR which eventually increases earnings. In word press, There are customized plugins available for placing ads in middle of the posts. But in case of blogger it is some what tricky part to place adsense ads in middle of all the posts. We have developed a script which can place adsense ads in between the post exactly in the middle of the content. The procedure for placing adsense ads in middle of  the posts in blogger is shared below.

Place Adsense Ads Automatically In Middle of All The Posts In Blogger:

Follow The below process to place adsense ads in Middle of all the posts automatically in blogger.

Step 1:

Login to Your Blogger Account
Go to Template >Edit HTML

Step 2:

Search For Below Code in your template.
<data:post.body/>
You will get multiple codes similar to above code. You have to select the second code which is similar to above code in order to make the script work properly.

Step 3:

Replace The above Code With The Below Code.

Step 4

Replace The Place Your Ad Code Text With Your Adsense Ad Code in the above code and save your template.

If you are facing any kind of issue then do let us know in your comments. Happy Blogging Cheers :)
To post your business blog entries automatically on your Facebook Timeline, you can use RSS Graffiti. This app doesn’t limit you to importing only blog posts: You can use it to bring in any RSS feed from anywhere, much as you can with Social RSS. You can also use RSS Graffiti to post in Facebook Groups.
You can control how many posts per day are pulled in, just in case the RSS feed you enter has more posts than you want to share with your community.
Adding RSS feeds can help you add content to your Page. You may want to use RSS feeds to import industry news or other helpful blogs. You can search some of the RSS-feed directories that are available, but you’re better off bringing in a feed from a site that you know, like, and trust.
RSS Graffiti is highly configurable. You can configure the post style, the scheduling of updates, and the times when the messages are posted. All these features translate into many settings, all of which you can change. Most of the settings can be left at their default values.
One thing that RSS Graffiti doesn’t have is a tab that you can add to your Page. It only posts the RSS feed on your Timeline. If you want a place to show your most recent blog posts on your Facebook Page, use Social RSS or NetworkedBlogs.
To get started with RSS Graffiti, follow these steps:
  1. Log in to Facebook as your personal Profile.
  2. Go to http://apps.facebook.com/rssgraffiti.
    You see information about the app and how it will appear on your Timeline.
  3. From the Who Can See Posts This App Makes for You on Your Facebook Timeline drop-down menu, choose Everyone.
  4. Click the blue Go to App button.
    You see a Request for Permission screen, asking you to allow RSS Graffiti to access your basic information.
  5. Click Allow.
  6. If you see a pop-up window, click Go to Permissions.
    You’re taken to the RSS Graffiti dashboard.
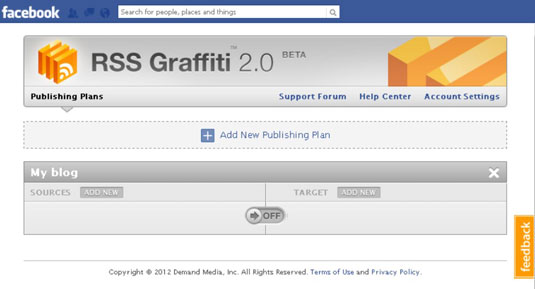
  7. Click Add New Publishing Plan.
    A window appears, allowing you to name your publishing plan.
  8. Type a name in the text box, and click Create Publishing Plan.
    A configuration area appears.
    image0.jpg
  9. Click the Add New button next to Sources.
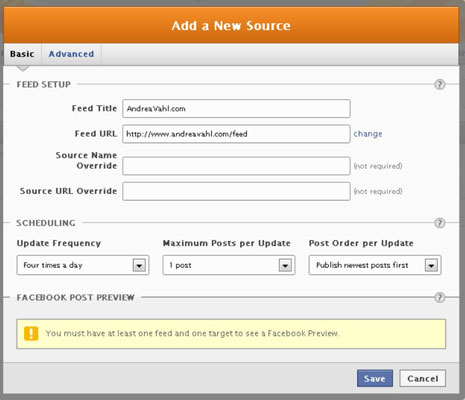
    A pop-up window appears, allowing you to add your RSS feed.
  10. Add the address of your RSS feed (refer to “Getting the Address of Your RSS Feed,” earlier in this chapter), and click Add Source.
    A pop-up window appears, allowing you to configure the RSS feed.
    image1.jpg
    You can configure many features of RSS Graffiti, but the default settings work well for most people, and you can skip to Step 11.
    Or, if you want to customize your settings, you can read a little bit more about what each of the settings means here:
    • Source Name Override: Change the name that appears when you post the article or blog post.
    • Source URL Override: Override the URL that points to the website. Leave this field blank to use the feed’s URL.
    • Scheduling: Change the update frequency and maximum posts per update, and specify whether you want the newest posts to post first.
    On the Advanced tab, you can set these options:
    • Format Message: Add messages to each post, using these options. You may choose to add a static message such as New Post from my Blog or something similar.
    • Filtering Options: Set the date and time after which posts can be published on your Timeline. Older posts won’t be published unless you change this option. You can indicate how long a post must be up before it’s posted to your Timeline by setting the Eligibility Age option. You may want to use this option if you sometimes make minor edits in posts shortly after you publish them.
  11. Click Save after you’ve configured your source RSS feed.
    The pop-up window disappears, and you see the name of the feed in the Sources area.
  12. Click Add New next to Target.
    A pop-up window appears, showing your available Pages and groups.
  13. Select the Page.
    You can also choose to publish on behalf of the Page or your personal Profile, but for now, accept the default selection of the Page.
  14. Select the post style.
    You can choose Standard, Compact, or Status Updates. A preview window appears next to each selection. Choose what works best for you by selecting the appropriate radio button.
  15. Click Save Changes.
    Your publishing plan is finished, and your posts will start updating when you make a new blog post.
Be careful about adding just any RSS feed to your Page. After all, you don’t control that content, and you may not agree with a post that’s brought in.
Android phone is very smart and intelligent. You find lots of secrets in android phone. Now In this post, we put some best android secret codes. With these secret codes you access android secret portal and services.

hidden-android-secrets-codes
 You need to only open dialer in android phone and dial these below codes. These secret android codes works in almost all type of phone like lg, sony, samsung, htc, google, motorola and xolo.

1. Complete Information About your Phone  


 *#*#4636#*#*

 This code is used to get some  really interesting information about your phone and battery. It shows following 4 menus on screen:

    Phone information
    Battery information
    Battery history
    Usage statistics

    2. Factory data reset


    *#*#7780#*#*

This code is used for the factory data reset. It'll remove following things:

    All the Google account settings stored in your phone
    System and application data and settings
    Downloaded applications in your Internal SD!

It'll NOT remove:

    Current system software and bundled application
    SD card files e.g. photos, music files, etc.

Note: Once you give this code, you get a prompt screen asking you to click on "Reset phone" button. So you get a chance to cancel your operation.


    3. Format Android Phone


      *2767*3855#

    4. Phone Camera Update


    *#*#34971539#*#*

This code can be used to get information about phone camera. It displays the follwing 4 menus:

    Update camera firmware in image (Don't try this option)
    Update camera firmware in SD card
    Get camera firmware version
    Get firmware update count

WARNING: Never use the first option otherwise your phone camera will stop working and you'll need to take your phone to service center to reinstall camera firmware.


    5. End Call/Power


    *#*#7594#*#*

This one is my favorite one. This code is used to change the "End Call / Power" button action in your phone. By default, if you long press the button, it shows a screen asking you to select any option from Silent mode, AirPlane mode and Power off.
You can change this action using this code. You can enable direct power off on this button so you don't need to waste your time in selecting the option.

    6. File Copy for Creating Backup


    *#*#273283*255*663282*#*#*


This code helps you in opening a File copy screen where you can backup your media files e.g. Images, Sound, Video and Voice memo.

    7.  Service Mode


    *#*#197328640#*#*

This code can be used to enter into Service mode. You can run various tests and also change settings in the service mode.

    8. WLAN, GPS and Bluetooth Test Codes:


*#*#232339#*#* OR *#*#526#*#* OR *#*#528#*#*           - WLAN test

*#*#232338#*#*                  - It Shows WiFi MAC address

*#*#1472365#*#*                - GPS test

*#*#1575#*#*                      - Another GPS test

*#*#232331#*#*                  - Bluetooth test

*#*#232337#*#                    - Shows Bluetooth device address

    9. Codes to get Firmware version information:


*#*#4986*2650468#*#* - PDA, Phone, H/W, RFCallDate

*#*#1234#*#* - PDA and Phone

*#*#1111#*#* - FTA SW Version

*#*#2222#*#* - FTA HW Version

*#*#44336#*#* - PDA, Phone, CSC, Build Time, Changelist number

     10. Codes to launch various Factory Tests:


*#*#0283#*#* - Packet Loopback

*#*#0*#*#* - LCD test

*#*#0673#*#* OR *#*#0289#*#* - Melody test

*#*#0842#*#* - Device test (Vibration test and BackLight test)

*#*#2663#*#* - Touch screen version

*#*#2664#*#* - Touch screen test

*#*#0588#*#* - Proximity sensor test

*#*#3264#*#* - RAM version
Facebook is one of the best for chatting with your friends. If you are PC user , you use browser for Facebook Chatting . But sometimes you don't like always opening browser for chatting with your friends. Now In this post we post a Best way for chatting with your friends without opening web browser. 


How to Facebook Chat without Opening Web Browser in Windows PC from Nimbuzz

Nimbuzz is a Instant Messaging application for Windows PC. With this software you can easily chat with your facebook friends.
Nimbuzz Best Features:
  • You can Save your Chat for Offline browse.
  • Send Files 
  • Always available in Slow Connection.
  • Also support Google Talk


Use Facebook Chat with Nimbuzz

1. Create Account on Nimbuzz Messaging Application.
2. Download Nimbuzz Messaging App for Windows PC.
3. Sign in with your username and password.
4. Click on Settings icon and choose Options.
nimbuzz chat

5. Open Social Accounts Options and Choose Connect with Facebook.
nimbuzz chat

6. Enter Your Facebook Username and Password.
nimbuzz chat


If your Internet Speed is good , you see all your facebook friend list in Nimbuzz Messaging Platform. 
Now you can chat anyone without opening facebook in browser.
Popcash is one of the most popular way to earn money. Popcash is monetize your blog and website for popunder ads. 
You can easily earn lots of money through it.So in this post I tell you how the Other Bloggers and I earn hundreds of dollars from this adnetwork. 
Popcash approved any blog ,low traffic or high traffic blog. This is very good for new bloggers. So now lets start how can you implant Popcash in your blogger. 


Sign Up and Install Popcash ad in Your Blog


  1. First open Popcash Signup Page.
  2. Fill up the form with right information.
  3. When you form is approved in Popcash they sent mail in your gmail (other mail.)
  4. Now login with your popcash username and password in Popcash.
  5. Here you see control panel of Popcash Adnetwork.
    popcash control panel
  6. Click on Websites and add your website.
    popcash add website
  7. Type of website domain and select category.
    popcash add website
  8. They take few hours for approving your website. When popcash approved your website they sent you another mail.
  9. Get Back to the control Panel and click on Get Code.
    popcash get code
  10. Copy the code and open your google blog.
  11. CLick on layout. Scroll down and click on Add a gadget.
    add a gadget in blog
  12. Select HTML/Javascript wideget and paste your script.
    add a gadget in blog


Why I like Popcash 

Popcash minimum payout is 10$.
Popcash process your money in 7 days.
Realtime updates.
High rates comparing other networks.
Approved any website or blogs.


With this prophethacker blog I earn more than 900$ from Popcash adnetwork in months. If you follow this trick you can also earn lots of money through this adnetwork.If you got any problem contact me.

Popcash Home page

Control Android From Pc

Saturday, January 17, 2015
Posted by Brandon
  • Advantages and Features of Airdroid :-
  • You can also directly talk from PC.
  • Send and Receive SMS from PC.
  • Transfer apps,images,videos,files from PC to mobile through wireless network.
  • Install/Uninstall apps easily and also take complete back up of your device.
  • Trace your device when you lost it and much more features available in Airdroid.


How to Use Airdroid


  1. Download Airdroid on your android device
    Download link : https://play.google.com/store/apps/details?id=com.sand.airdroid
  2. After Download Install it and Open this app then Click on Start icon.
  3. After open it , copy the web address after clicking start icon.
  4. Now from PC browser go to web.airdroid.com then Enter the Web address you copied in step no 3.
  5. Make sure that your android device and PC is connected to same Network.
  6. If you are going for web.android.com then you need to verify your device by entering pin/password or by scanning QR code.

Now you have successfully connected your android device to PC .You can start upload files by clicking files logo on desktop,you can chat from your PC and can have full access to your android device or android tablet.
Latest :-

Now onlineঃ

Welcome to My Blog

Popular Post

Blogger templates

Contact Form

Name

Email *

Message *

online radio

Flickr Images

Page

Find Us On Facebook

Powered by Blogger.

Translate

Popular Posts

Video Of Day

- Copyright © Best place for it tips and tutorial -Robotic Notes- Powered by Blogger - Designed by Johanes Djogan -